My Shiver/ Linger Obsession.
1:59 AM
Well, the title says it all. I LOVED Shiver. Want to know why? Because it made me cry on the very last page. And I never cry. Unless I'm hormonal. But Shiver was just so beautifully written and so well-developed that yup, I cried.
And then Linger came out. And I didn't cry, but I still just straight up loved it. So Maggie Stiefvater was coming to Austin. Oh mah goodness. I had to celebrate!
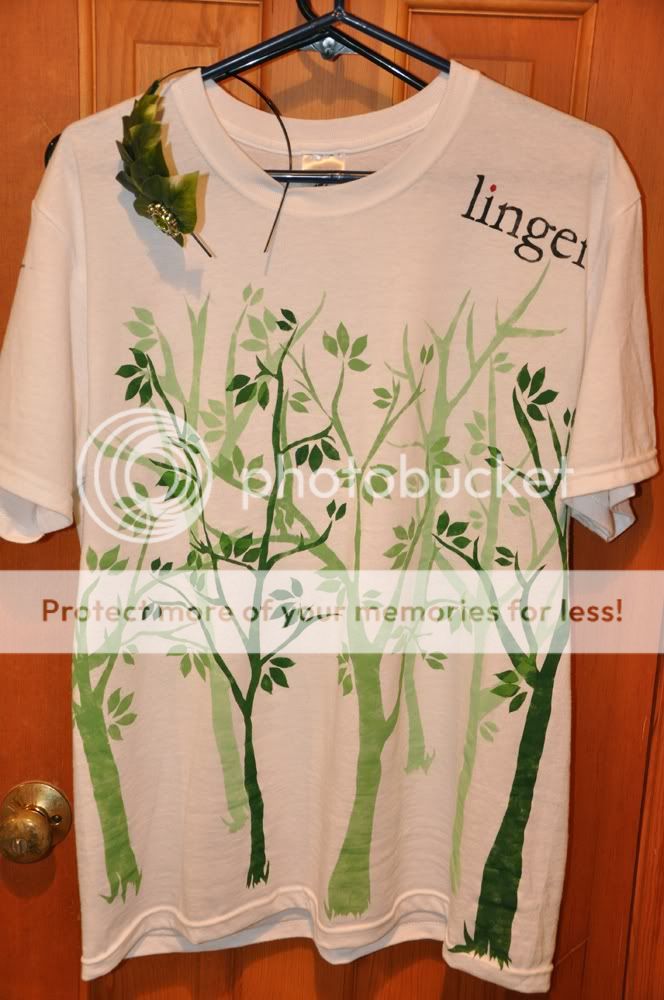
I spent 3 arduous days laboring over designing and making 2 shirts for me and my friend Stephanie. We had to look rockstar, after all. And of course, we got a ton of comments on them at the signing and asking if I was selling them. Yeah, hah, at like $50 a pop!
AND (the highlight of my night) was when Maggie asked where I got them printed and I was like oh, no no, I made them. She was impressed. I beamed.
Now this process was so long and complicated that I couldn't begin to tell anyone at the signing how I did it. But here's my tutorial of sorts. And I'm sorry for the lack of progress pics, I suck at stopping and thinking "picture time!".
All right, if you have ever used freezer paper stenciling, that's what this is basically.
You'll need:
- freezer paper (found near wax paper in the grocery store)
- an iron
- stenciling sponges (I used the ones without wooden handles)
- acrylic paint (or fabric paint, but I have a preference with acrylics and I used BASICS brand paint)
- X-acto knife (or craft knife)
- pencil
- stencil blanks (Hobby Lobby has them!)
- masking tape
1) First I drew the trees and made them the sizes I wanted.
I actually scanned the drawings, blew them up and printed them off so I could just trace them on to the freezer paper.
2) Draw the trees on the MATTE side of the freezer paper and cut it out.
So it looks like this:
3) Position it and get that iron ready! And iron the sucker! Iron all over, especially the edges. Some tutorials say to iron both sides. I never did that and I had no problems with it.
4) Now, spread some paint out and try to coat the sponge evenly. Then dab the paint on the stencil. Now it's not as important with freezer paper stencils, but be sure to make the motion up and down and not pushing the paint side to side at all.
I've ruined many a good shirt doing that...
5) Let it dry. Why I like acrylic over fabric paint is because fabric paint needs to be heated or something and I don't have the patience for that. Bah.
With stenciling, the acrylic paint layer is really thin so it doesn't take long at all to dry!
6) Peel off the paper. And voila!
Now repeat this a billion times. Or so.
7) For the leaves, I used a plastic stencil blank and just cut them out once (3 different batches of leaves). Instead of ironing it on, just use masking tape to secure them. The leaves part goes really fast.
Also, to get the color/fade effect that's on the cover of Linger, place the first trees higher up and color them the light green, medium in the middle and dark green in the foreground. That's a distance/proportions thing.
Click on the pictures to see a bigger version!
Now did I have Maggie sign the shirt I sprained my index finger's first knuckle on? Yes. Yes, I did.
YAAAAYYY!!!
And so you know what all this leads to...?
MY FIRST GIVEAWAY!!!!
Now I'm a little beginning baby blog, so this is going to be super easy.
Comment on this post to enter. You MUST be a follower to enter.
Just post your name and email. That's it!
And YES! It is open internationally!
(edit) This is for a SIGNED SHIVER!
Want more than one entry? You can do one or all!
- With the comment include what you LOVED about Shiver or Linger OR stroke my ego and tell me what you thought about the shirts! (I'm kidding... kinda...)
- Twitter - RT this contest on Twitter with the hashtag #FYshivergiveaway or @ me (JustlyJennifer) into the RT (and if you do this, please make it easy on me and include your Twitter name with your post...).
- Facebook - Post it on Facebook (and provide a link in the comment).
Contest will end a week from today, August 6th! Yay! I'm excited! :D


July 30, 2010 at 5:52 AM
Okay, I figured out how to follow. Now do I win a shirt? LOL
What can I say about Shiver and Linger.....They are not like anything else I have ever read and I know I will re-read them many times. I am doing a wall of my bathroom in a Linger motif, keep searching ebay for a red coffee pot (found one but so far have restrained - I just bought a new coffee pot a month ago), ordered six origami cranes off ebay, and already my whole house is decorated in wolf & has been for years. BEAUTIFUL writing in these books and that sounds so simple for something so special.
July 30, 2010 at 6:02 AM
Wow, I love your tops you have made! You should sell these, you'd make loads! :D
Is this giveaway international, because I'd love to win one! :D
Zoë x
http://www.zoesbookblog.com
July 30, 2010 at 6:10 AM
OMG, I just loved the shirts!
You're really talented, I think you could create more and more and then open a store ;D
Well, I really want one *-*
If it's international, please count me in
Lislaine Oliveira
lismagol@gmail.com
July 30, 2010 at 7:28 AM
So what are you giving away? ;)
July 30, 2010 at 7:39 AM
Those.shirts.are.AMAZING!!!! WOWZA!!! You totally outdid yourself, Jennifer!!! AWESOME!!!!! **clapping**
I LOVED Shiver and cannot wait to get my copy of Linger in the mail!!!
I posted about your contest and blog on my Facebook and Twitter:
http://www.facebook.com/photo.php?pid=44040459&id=29624499#!/twilighttammy
http://twitter.com/TwilightTammyTM/statuses/19913600890
And I am still reeling from how amazingly awesome those shirts are!!! **bows down**
Tammy
tammyweisensel (at) yahoo (dot) com
Thank you for sharing your "How To" with us!!!
July 30, 2010 at 7:42 AM
I am extremely curious as to what you are actually giving away! But to show my support here are the links I posted:
Facebook: http://www.facebook.com/?ref=home#!/donna.hale
Twitter: http://twitter.com/jaevenstar
My twitter name is Jaevenstar. My name as a follower on here is Donna.
I loved Linger because it was a book that kept me flipping the pages as quickly as possible yet all the while not wanting the story to end (and throughout all that dreading the ending as well). I Love the wolf-world that Maggie created, too, stepping away from the traditional werewolf qualities for her world.
~Donna
July 30, 2010 at 7:43 AM
Oh, and your shirts are A.M.A.Z.I.N.G!!!!!! I want one!! (hint hint)
July 30, 2010 at 7:47 AM
Hey Jenn,
WOW r u kidding those Shirts ROCKS! Maggie must have been impressed!
Why I love Shiver and Linger and soon to be Forever! because these r the books you will read until your 100. They are amazing!
http://www.facebook.com/topic.php?topic=375&post=3088&uid=124295450942618#!/twilightdance?v=wall&story_fbid=141524099205234
https://twitter.com/TwilightsDance/status/19908036753
July 30, 2010 at 7:50 AM
Wow ~ I really love the t-shirts! They look great! (I want one!) And I'm following you now and posted your contest/blog on my FB. :)
Marie
BellaMarie@tampabay.rr.com
http://www.facebook.com/profile.php?id=100000015829397
July 30, 2010 at 8:00 AM
I'm so impressed! It sounds like it was a long ardous process to make those shirts. Count me in for your contest.
wastepaperprose(at)gmail(dot)com
July 30, 2010 at 8:17 AM
I've always thought that crafts are complicated so I admire the shirts and the effort you put into them! They look awesome!
Thanks for the contest :D
Andrea
email: brigneti(at)gmail(dot)com
-tweeted here: http://twitter.com/andreadbc/status/19916865839
July 30, 2010 at 8:23 AM
LOVE LOVE LOVE THESE SHIRTS! My favorite is the one with the red paw print! How amazing! What a creative mind you have. Oh how I wish I were more creative. I just have to live vicariously though others like you!
Shiver made me cry. And cry...I scolded the person who encouraged me to read it for turning me into a sap! (I don't cry reading books...ever)! Shiver was incredible. You lived the story as you read it. I have not yet read Linger as I am still trying to find it in my area. I will devour it though!
Posted on FB http://www.facebook.com/profile.php?id=1556456189&v=wall&story_fbid=142676935756767
Twittered: http://twitter.com/JustlyJennifer/status/19898400097 (fangedmom73 is my twitter name)
Thank you for offering this contest!
email boo2bosh@yahoo.com
July 30, 2010 at 8:33 AM
I love the shirts what a great idea!! I might have to give it a try!! I will retweet this to my followers. @JessRing84
JessRing84@gmail.com
July 30, 2010 at 8:37 AM
OOH I LOVE THIS SHIRT!! ;) I posted twitter and FB
fb: http://tinyurl.com/2bqgxjx
twitter: http://twitter.com/stephdc/status/19918247078
stephdc83@gmail.com
July 30, 2010 at 10:03 AM
LOVE the shirts! So awesome.:)
I RT'd the contest (@Travis_Pearson)
I can't wait to read Shiver!
spongyman1026@yahoo.com
July 30, 2010 at 10:25 AM
I LOVE this shirt! You did an amazing job. (I made a Breaking Dawn one and people asked me where I bought it! :D)
I am following this blog.
I tweeted about the contest here (AJSpindle):
http://twitter.com/AJSpindle/status/19925989943
AJSpindle@yahoo.com
Thanks for the chance to win! :)
July 30, 2010 at 10:55 AM
Hi!
I'm Ella! You did an amazing job on those shirts! They're beautiful! :D Oh, and I just became a follower! My e-mail address is: breezysea23@hotmail.com
~Ella
July 30, 2010 at 11:58 AM
Hey there!
Is this open internationally? I'm from Germany but I'd LOVE to have one of those shirts! They're awesome! :D So much for the sucking up part^^
Shiver and Linger are absolutely awesome! I cried as well but I cry all the time while reading. Still it was a fabuloud read and it is such a shame that it has not been published in german yet!
And I tweeted it on http://twitter.com/MrsJenkins83
My e-mail adress is ninadecker13@freenet.de
*Nina*
July 30, 2010 at 1:46 PM
Yay a new blog :) Love finding new blogs to love :P
And those shirts are gorgeous :)
Ari
teensactuallyread@gmail.com
July 30, 2010 at 1:48 PM
WOW did you do a fine job making those shirts. Thanks for sharing the how to's. vsloboda@gmail.com
July 30, 2010 at 1:50 PM
Oh, my dumb sleep deprived brain forgot to mention here that I'm giving a SGINED SHIVER away!! I've edited the post to include a picture.
SUPER sorry! But... considering the interest I might do a giveaway in the future! :O
July 30, 2010 at 2:39 PM
AGGGGH!!! I love the shirts!! They are awesome Jennifer, but the process is so complicated I'm sure if I try it I will ruin it several times. I think I'll save $50 and have you make me one instead, I love them!!! You guys looked awesome! =D
July 30, 2010 at 3:34 PM
Here's my updated tweet. My entry is up there! http://twitter.com/AJSpindle/status/19944288704
AJSpindle@yahoo.com
July 30, 2010 at 4:03 PM
Loooove those shirts!
My name is Claudia.
claudiap-123(AT)hotmail(DOT)com
@DreamClau. I teeweted here: http://twitter.com/DreamClau/status/19945989496
Thanks for the giveaway!
July 30, 2010 at 4:22 PM
OMG Those shirts are AMAZING! You could seriously sell these!!! Well done girls! I'm not sure what you're giving away but I'm in!
lynsey(AT)narrativelyspeaking(DOT)com
July 30, 2010 at 4:34 PM
I cannot believe how beautiful these shirts are. If I dont win one, I think you should sell them!
(made me cry too)
Here is my tweet! https://twitter.com/TM_QueenJane
July 30, 2010 at 4:42 PM
Hey, my name is Claire and my email is cbbindon{AT}shaw{DOT}ca!
First off, your Linger shirts are specacular! They really are, amazing job! And what did I like about Shiver and Linger (besides EVERYTHING)? I liked the fact that the werewolves were unique from other werewolves because of what triggered their shifts. I really enjoyed how it was temperature instead of a full moon or something! The books were really well written as well, which to me, always makes a book that much better.
I also posted about your contest on my twitter! My username is Claireee94 and here is a link to my tweet: http://twitter.com/Claireee94/status/19947576210.
Anyways, thanks for hosting this awesome contest!
Claire :)
July 30, 2010 at 7:33 PM
I love the shirts! They're pretty! :)
Len
maidenveil(at)gmail(dot)com
July 30, 2010 at 7:46 PM
Your shirts are beautiful! You are very creative. I like Shiver & Linger because of the writing, the love story, and because they are set in Minnesota. I RT this contest on twitter; my account name is Viking92.
Thanks for this contest and good luck with your blog.
July 30, 2010 at 7:49 PM
Sorry I forgot to list my email: carousel96@hotmail.com
July 30, 2010 at 8:08 PM
Those shirts are really cool! You should do a cafepress or etsy store with them! And I felt the same way you did about Shiver and Linger. How will I ever make it to Forever!
bookluvr3@gmail.com
July 30, 2010 at 8:15 PM
I'm out of town & saw this contest earlier today & had to pay some $$ to get an internet connection so I could enter this contest. Good ego stroking? ;) I know its been said but, wow. Truly these shirts are beautiful and such a sweet tribute to an amazing story. I love all of Maggie's books and so jealous & happy for the people have have gotten to meet her. I'm always eager to see the next thing you've created & shared for us to see!
Annie
froglet403@aol.com
July 30, 2010 at 8:27 PM
Best shirts of the night!
July 30, 2010 at 11:46 PM
Those shirts are crazy cool. It's soo awesome that you made them yourself. You should totally make a shirt for Maggie if you could send it to her, since she liked them.
I just finished Linger. It was sooo good. I loved the new characters that were added to the story.
E-mail: lyssad87@gmail.com
Twitter: @lyssad87
July 31, 2010 at 5:45 AM
I LOVE your shirts! They are absolutely gorgeous! Thank you for making this awesome giveaway international! :D
Giada M.
fabgiada (at) gmail (dot) com
July 31, 2010 at 5:52 AM
Great job on those shirts! They turned out really cute! I got to meet Maggie in Houston this past Wednesday... she was a total skit!
August 2, 2010 at 7:53 PM
Just popping in to say I love your shirts!! Dang, you are talented!!! (((hugs))) I can hardly wait to see what's next on your creative plate.
P.S. Not entering the contest, just saying "hi"!
August 4, 2010 at 8:14 PM
The shirts are amazing!! Would love Shiver, so I can send one off to a friend in Chile ;)
August 5, 2010 at 2:30 PM
Those shirts are awesome!
Thanks for the giveaway!
ferretvamp14[at]live[dot]com